Category Archives: Cake

Walnut Banana Bread

Banana is one of my husband’s favorite fruit. But sometimes, He forgot to eat them, and banana got ripe very quickly. So I would use them to make smoothie or cake or bread.

This summer when we went back to my hometown, we brought so many walnut back. My mom just cracked them and store the shell-removed walnut in 2 large containers. My husband likes walnut, so he adds some in his yogurt. Yet, we still have a lot. So I tried to bake something with walnut and banana.

Ingredients:

Bananas 2

butter 1/2 cup

white sugar 1 cup

eggs 2

vanilla 1/2 tsp

flour 1 cup

baking soda 1 tsp

salt 1/2 tsp

cinnamon powder 1/2 tsp

chopped & toasted walnut 1 cup


  1. Preheat oven to 170 Degree C.
  2. Cream butter and sugar together till light and fluffy.
  3. Add in 2 beaten eggs and vanilla. Stir well.
  4. Add in mashed bananas. Mix them together.
  5. Sieve in all the dry ingredients: flour, baking soda, salt and cinnamon powder. Mix till combined.
  6. Butter spray the loaf pan. Dust it with flour.
  7. Pour all the batter into the pan.
  8. Into the oven for 50-60 mins. Check with a toothpick. If it comes out clean then it’s done.

Let it cool down for a little while.

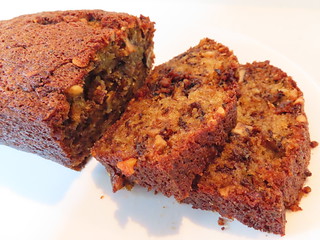
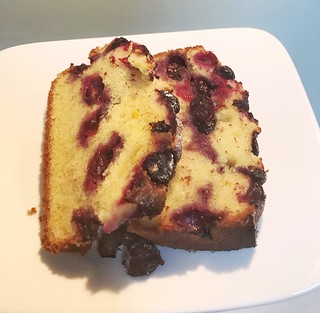
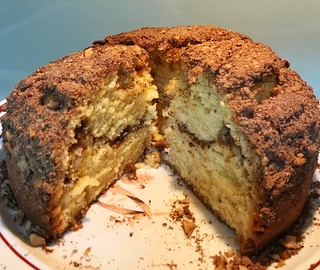
Cut it and you will find it’s very moistened and firm.

Full of walnut and banana flavor. Very nice!

Blueberry Lemon Cake

My husband and I are not big fans of fresh blueberry. But we both like food made from blueberry, like jam or cake. So if I buy blueberries from supermarket, it means I will bake something with blueberry.

Preheat oven to 180 degree C.

Ingredients:

Butter 130g

Sugar 120g

Vanilla 1 tsp

Egg 1

Flour 190g

Baking powder 1 tsp

Salt 1/4 tsp

Zest of 1 lemon

Milk 1/2 cup

Blueberry 2 cups

Flour 1 tablespoon

Lemon juice 1 tablespoon

1. Cream butter with sugar till light and fluffy.

2. Add in vanilla. And eggs one by one.

3. Mix fry ingredients (flour, baking powder, salt and zest of lemon) together.

4. Add flour and milk into butter mixture alternately. 1/2 flour and 1/2 milk one time.

5. Add 1 tablespoon flour and lemon juice into blueberries. Toss a bit.

6. Place 1/2 batter into baking pan. Over it spread 1/2 blueberries. Then add in the rest batter. And top it with rest blueberries. Light press blueberries into the batter.

The batter is done:

After 60 mins.

Cool down for a while.

I was too lazy to make any glaze. So i just sprinkle icing sugar over the top.

Cake is very moist.

Jing Gao (甑糕)

I will never say no to any dessert made from sticky rice or sticky rice flour. This cake is from Xi’an. It became popular recently due to a Chinese TV drama. The Chinese name 甑糕 actually should be pronounced as “Zeng Gao”, however, people from Shan’an Xi called it Jing Gao. 甑 is an ancient earthen utensil for steaming rice. 糕 means cake. Well, I have to say this kind of sticky rice cake is really time-consuming in both preparation and cooking.

Ingredients:

sticky rice 1/2 1 cup

red kidney beans 3/4 cup

dried red dates 1 cup

honey red dates 100g

  1. Soak sticky rice and red kidney beans in water for overnight.
  2. Dried date also need to be soaked for a while. Then cut them into halves and remove the cores. And do the same to honey red dates. I added honey red dates just wanted to add sweet taste to the cake. If you want it to be very sweet, you ca also add sugar to the sticky rice when steaming them. I was kind of lazy. Fortunately, dried red dated I have are already core-removed. I just need to cut them. And I did nothing to the honey dates and just put them in as a whole.
  3. Prepare a big bowl. Brush bowl with oil or you can just do what I did, to use parchment paper. The bottom layer is 1/3 sticky rice. Then 1/2 red kidne beans. Then 1/3 sticky rice. Followed by 1/2 red kidney beans. Then the rest 1/3 sticky rice and topped with red dates & honey dates. You can arrange the layer as you like. But make sure the bottom is sticky rice and the top is red dates.


Then add water into the bowl, just equally high to the red dates.

Steam for 3 hours. I steamed it for 4 hours. I read online that authentic Jing Gao should be steamed overnight with low heat. A pressure cooker will make it much easier.

After steaming, don’t open the lid immediately. Let it stay for 15 mins.

Use the back of a spoon to press the red dates and mash them.

Red kidney beans are very soft and smooth. My husband said it tastes like sweet Lor Mai Gai. 🙂 But still, he loves it. I love it very much too.

Spring Onion Cake That I Can Never Have Enough (葱油饼 Cong You Bing)

There is no word can express how much I love spring onion pancake. There are some Shandong Pau shops in Singapore. They also sell Cong You Bing. Yet, The ones they sell are not the same to the ones I like. Spring onion cake I like is the crispy type. My mom is super good at making amazing spring onion pancake. Too bad, I can’t find any similar to my mom’s. So I have to figure out by myself.

I wrote a post before:

Improved Spring Onion Pancake Recipe

And recently, I cooked spring onion pancake again, just because I really missed them.

In my previous post, I applied my mom’s advice: Use half hot water and half cold water. But this time, I think I figure out some secret to make good spring onion pancake.

  1. No matter use hot water or whole cold water. The key is soft dough, which means you better use more water to make sure dough is soft enough. If the dough is hard, then the pancake will taste hard and dry.
  2. Use more spring onion, seasoning and oil. Obviously, it is true. Spring onion, and seasoning will make a lot happen during frying.
  3. Low medium heat is better during frying. This is important to make sure the outside layer is crispy. If the heat is high, it’s easy to be burnt outside while the dough inside is still raw.

https://flic.kr/p/Rt6bme

https://flic.kr/p/2f9NUcS

Crispy spring onion pancake is the true spring onion pancake.

My husband also loves it.

Upside Down Banana Cake

I tried banana cake before:

Banana Cake

This upside down banana cake is kind of an improved version of banana cake. It’s a combination of banana cake and caramelized banana top.

Ingredients:

Butter 80g

Sugar 120g

Egg 1

Flour 140g

Milk 1/4 Cup

Baking Soda 1 tsp

Baking powder 1 tsp

Ripe Bananas 2

Vanilla 1 tsp

Salt 1 pinch

Cinnamon powder 1 tsp

Butter 3 Tablespoon

brown sugar 1/4 cup

vanilla 1/2 tsp

Banana 1

1. Cream butter and sugar till light and fluffy.

2. Add in egg, vanilla and baking soda. Stir well.

3. Add in 2 mashed bananas and milk. Stir well.

4. Add in flour, salt and cinnamon. Mix them well and set aside.

5. Preheat oven to 180 degree C.

6. Add 3 Tablespoon butter and 1/4 cup brown sugar into a sauce pan. Turn to low heat and stir till sugar melts.

7. Cut an another banana into slices and arrange at the bottom of baking pan.

8. Pour the butter & brown sugar mixture into the pan.

9. At last pour the batter in.

10. Into the oven and bake for 30-40 mins.

Cool down a bit. Cover the cake with a plate. Then flip it over.

And voila!

https://flic.kr/p/2dK55G3

Really moisture.

My husband loves it.

Recipe: Chocolate Pound Cake

I always ask my husband about which pic to choose as featured image of blog. He gives me his opinion usually from a very different perspective.

He chose this picture for this blog. And his reason is that this picture look like it’s snowing.

I was like: WHAT???

Anyway, I still followed his advice.

If you always do baking at home and search baking recipes on YouTube. I bet you know Stephanie Jaworski from Joy Of Baking. She gives so many great recipes and demonstrations, which are very easy and hardly to fail. I really like her videos. And I tried some of her recipes, they turned out really great.

I followed her instructions about this Chocolate pound cake, except I reduced sugar and I didn’t do the glaze at the end.

Her video demonstration is here:

https://m.youtube.com/watch?v=gI8ShUTkJf8

If you don’t have time for video, I can show you the steps:

Preheat oven to 180 degree C.

1. Dissolve 25g cocoa powder in 60 ml very hot boiling water. Set aside to cool down.

2. Prepare dry ingredients: 180g flour, 1 tsp baking powder, 1/2 tsp salt. Mix them well.

3. Cream 225g butter with 200g white sugar (in video, she says 250g. I reduced sugar to keep it less sweet) till light. Add in 1 tsp vanilla extract. And 4 eggs one by one.

4. Add in cocoa water mixture. Stir well.

5. Add in 1/2 dry ingredients and 2 tablespoon milk. Mix well. Then add the rest dry ingredients.

6. Patter in baking pan. Bake for about 60 mins.

https://flic.kr/p/Q5d3uA

When it’s 50mins, I checked with toothpick, it didn’t come out very clean, so I baked for another 10 mins. I didn’t make the glaze and just dust icing sugar instead. Yeah, that’s why my husband related it to snowing.

See? Stephanie’s instruction is always simple and clear to catch up with.

My husband loves the cake.

My First Try On Ang Ku Kueh

There is a kind of glutinous rice flour ball stuffed with red bean paste or pork floss called 青团 (Qing Tuan) in China. I love it very much.

And it looks like this:

Actually, I love almost all kinds of dessert made from glutinous rice flour. They taste very chewy. I love the texture and the flavor. Too pity, there is no Qing tuan here in Singapore. I only can eat them when I go back to China. Luckily, I found a desert very similar to Qing Tuan. And that is ang ku kueh. I’m very surprised I didn’t try it in the past 3 years. It’s still not too late to find them now. They taste very like Qing Tuan. Filling inside is a bit different. Ang ku Kueh has green bean paste, yam, peanut and coconut. And they have different colors. On the contrary, Qing Tuan only has one color- green. Because Qing means green in Chinese. Tuan means things in ball shape.

My husband is also a fan of ang ku Kueh, Which is very odd, because if he likes ang ku kueh, how come he never suggests me to try this dessert. And of course, he will always say: “I told you. I also bought some for you. You just don’t remember. ” Yo, dude. I may forget things sometimes. But when it comes to food, my memory will be super super good and I can remember super super clear. And the answer is NO! ! ! You didn’t even mention that you like ang ku kueh before.

Anyway, I found this video on YouTube. (My hobby is exploring all the cooking videos online of all cuisine. ):

https://m.youtube.com/watch?v=x3eMO75fBG4

And I tried it. Honestly, I don’t think my ang ku kueh turn out very good. A little softer than I expected. But they taste ok. My husband still likes them. One mystery about my ang ku kueh is that why the pattern and word on the mould disappeared while it was supposed to show on the ang ku kueh clearly. 😦

https://flic.kr/p/2cU1BMZ

I guess I will need to improve it next time.

Soufflé Pancake Recipe

My husband got up very late almost every morning except there is a meeting he needs to attend to or some stuff he needs to handle with. If I want him to get up early, I usually tell him  that I will make him a good breakfast on the night before. (He likes to have bread in the morning, so I only make him breakfast occasionally. He thinks that I cook lunch and dinner almost everyday, it’s already tiring to me so he can handle breakfast by himself). Last night, I told him that I would make him this soufflé pancake and he should get up earlier than before. Guess what happened today. I overslept too. 🙂 But I still decided to cook him this pancake since I already promised him.

I always wanted to try this fluffy pancake before. Yet, there is one big problem for me is that this recipe requires whipping egg white. Whipping egg white or cream is nightmare to me. I almost failed every time. On the bright side, whipping egg white is relatively not that hard.

1. Divide 1 egg yolk and 1 egg white. Put egg white aside for later use.

2. Whip egg yolk till the color becomes lighter. Then add in 1 tsp white sugar. Blend till fully combined.

3. Sieve in 20g flour. You can add in 2 or 3 times. Make sure there is no flour lump.

4. Whip egg white. You can use a electric mixture. I just used my hands. When the color becomes white and bubbles show up, add in 1 tsp sugar. Keep whipping, when many small bubbles appear, add another 1 tsp sugar. Whip till stiff hook forms.

5. Mix egg white with batter together.

6. Heat a pan. Brush a little oil. Turn to low heat during the whole frying process. Scoop batter and drop into pan. Cover the lid for 3 mins. Then flip over and fry for another 3 mins.

Serve with honey, butter, jam, and plain yogurt or whatever you like.

My husband loved them very very much. I just left to the kitchen for about 2 mins, when I came back to the dining table, he already finished all of them. 🙂

Cinnamon Walnut Coffee Cake

It’s been a long time for me to do baking since last time. Recently, my husband starts to have coffee almost everyday. Why doesn’t he have coffee before? That’s because he’s afraid he would be addicted to coffee. But why he drinks coffee now? That’s because he cannot resist the attraction of coffee. Yeah, I know sometimes my husband is so complicated and contradictory.  Sign~

Since he picks up the habit of drinking coffee, baking a coffee cake sounds a good idea to me.

Ingredients:

chopped walnut 1 cup

brown sugar  1/4  cup

cinnamon powder 1 tsp

flour  1 tbsp

coffee 2g (I didn’t intend to add coffee. Just that my husband heard I was going to bake a coffee cake. He lent his coffee to me very generously. Yeah, he didn’t know coffee cake is to be served with coffee, not made from coffee.)

ALL THE FIVE INGREDIENTS ABOVE IS TO FOR TOPPING AND FILLINGS. Mix them well in a bowl and set aside.

For the cake:

butter 1/2 cup

sugar 1 cup

vanilla  1 tsp

egg 2

baking soda 1/2 tsp

baking powder 1 tsp

salt 1/4 tsp

flour 2/3 1 cup

plain yogurt 3/4 cup

preheat oven to 180 degree C.

  1. Cream butter with sugar till light and fluffy.
  2.  Add in vanilla and eggs (one by one).  Mix well.
  3. Mix baking soda, baking powder, salt and flour in a bowl.
  4. Add 1/3 dry ingredients into butter, then 1/2 yogurt. Add the rest dry ingredients and yogurt alternately. Mix well before adding.
  5. Spread 1/2 batter into the baking pan. Sprinkle around 1/3 walnut & cinnamon mixture over it.
  6. Add the rest cake batter, and top with the rest walnut & cinnamon mixture.
  7. Into the oven for 40-50 mins.

https://flic.kr/p/2c9xKqM

Very nice.

Super Easy Cheesecake

I got this recipe when I was checking on China Weibo. And I believe the original recipe is from a Japanese APP called Cookpad. And the author’s name is Mari. This recipe is the easiest way to make cheesecake.

All you need are:

Cream 180g

White chocolate 40g

Cream cheese 200g

Eggs 2

Lemon juice 1/2tsp

1. Melt white chocolate with cream in a saucepan by low heat. Keep stirring.

2. Whip the cream cheese till light.

3. Beat eggs into cream cheese. Better add in 2-3 times.

4. Add lemon juice into cream cheese.

5. Add chocolate & cream mixture into cream cheese. Stir well.

6. Into preheated oven (160 degree C) and bake for 35mins.

Super easy. No extra tools are needed. No need to bake for a long time. And it also turns out not bad.

Solid and creamy.