Tag Archives: Chinese

Scrambled Egg With Luffa & Black Fungus

I have been in Singapore for over 3 years. Sometimes when I was shopping for groceries in supermarket, I wondered why there is no luffa here. And one day, I saw a strange long Gourd with ridges around it. I picked it up and saw the name “luffa”. Then I realized, luffa here is very different from the luffa in my hometown.

This the the one I saw in my hometown:

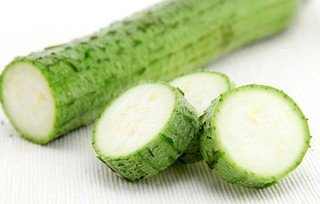
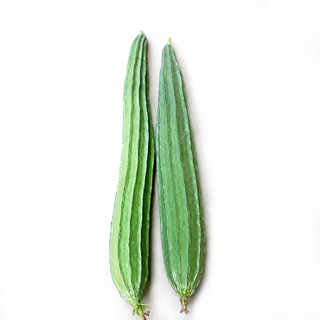
This is the one I saw here in Singapore:

They look different, but they can be cooked in same way.

1. Wash the luffa and peel it. Cut it into wedges.

2. Soak dried black fungus in water for about 3 mins. Remove the bottom. Then tear into smaller pieces.

3. Beat 3 eggs in a bowl. Also prepare a little ginger shreds.

4. Heat a pan. Add in 1 tablespoon oil. When oil is heated, pour egg in. Don’t stir till the bottom solidifies. Use chopsticks to stir eggs. Dish them out once almost cooked.

5. Use the same pan. Add in a little extra oil if needed. Add in luffa, stir fry for 1 min. Then add in black fungus and stir fry for 2 mins.

6. Pour in 1/4 cup hot water. Place ginger shreds over top. Cove the lid and simmer for 2 mins.

7. Remove lid. Turn to high heat. Add in scrambled egg. Quickly stir fry evenly and season with salt.

Serve hot.

My First Try On Ang Ku Kueh

There is a kind of glutinous rice flour ball stuffed with red bean paste or pork floss called 青囒 (Qing Tuan) in China. I love it very much.

And it looks like this:

Actually, I love almost all kinds of dessert made from glutinous rice flour. They taste very chewy. I love the texture and the flavor. Too pity, there is no Qing tuan here in Singapore. I only can eat them when I go back to China. Luckily, I found a desert very similar to Qing Tuan. And that is ang ku kueh. I’m very surprised I didn’t try it in the past 3 years. It’s still not too late to find them now. They taste very like Qing Tuan. Filling inside is a bit different. Ang ku Kueh has green bean paste, yam, peanut and coconut. And they have different colors. On the contrary, Qing Tuan only has one color- green. Because Qing means green in Chinese. Tuan means things in ball shape.

My husband is also a fan of ang ku Kueh, Which is very odd, because if he likes ang ku kueh, how come he never suggests me to try this dessert. And of course, he will always say: “I told you. I also bought some for you. You just don’t remember. ” Yo, dude. I may forget things sometimes. But when it comes to food, my memory will be super super good and I can remember super super clear. And the answer is NO! ! ! You didn’t even mention that you like ang ku kueh before.

Anyway, I found this video on YouTube. (My hobby is exploring all the cooking videos online of all cuisine. ):

https://m.youtube.com/watch?v=x3eMO75fBG4

And I tried it. Honestly, I don’t think my ang ku kueh turn out very good. A little softer than I expected. But they taste ok. My husband still likes them. One mystery about my ang ku kueh is that why the pattern and word on the mould disappeared while it was supposed to show on the ang ku kueh clearly. 😦

https://flic.kr/p/2cU1BMZ

I guess I will need to improve it next time.

One-pot Long Beans, Pork & Noodles

This is a very popular way to cook noodles in China.

1. Heat a pan, add in a little oil. Sear pork belly slices. Pork better has some fat, so pork belly is a good choice.

2. Add in chopped long beans. Stir fry till surface has some wrinkles on it.

3. Add in 1 tsp cooking wine, 1 tsp light soy sauce, 1/2 tsp dark soy sauce, 1 tsp oyster sauce, 1/2 tsp salt, 1/2 tsp white pepper, 1/2 tsp five spice powder and 1 tsp sugar. Stir fry evenly.

4. Place noodles on the top. Fresh soft noodles are the best choice. But if you use regular dry noodles, please boil them in advance till almost half cooked.

5. Pour in one small bowl of water along the pan. Cover the lid. Simmer till it dries up. Then add in another bowl of water. And simmer again. So this step is to steam the noodles.

6. When sauce reduces, turn to high heat. Remove the lid. Mix noodles well with sauce.

Serve hot.

Oyster Sauced Tofu

I still remember when I was very little, my family still lived in our first home. We moved several times after that one. At that time, there is a roasted goose shop (if I remember correctly) across the street. My father was very busy and he’s on business trip almost everyday. I could only see him when it’s Chinese New Year or less than 10 days in a year probably. Cos my memory about him was almost blank before I went to primary school (not because I was too little. I still keep the memory about other people, so…..) Later, he didn’t have to travel around to do business. He stayed in my hometown and opened a small factory. My mom became busy too. They worked together to run that factory.

I grew up with my sister. That’s why my sister and I are very close.

According to my vague memory, my father or mother used to cook tofu for us as breakfast when they had time and not rush to work. At that time, tofu sellers rode their bikes and went through the streets to sell their hot and freshly-made tofu. My parents would buy a small piece. Cut it into slices. Fry a bit with green chili. Season with salt. And that’s our very simple breakfast. Well, that’s the story came to my mind when I see tofu.

Back to my dish. Tofu is a very convenient food. It can be steamed, fried, boiled and roasted. This is a very simple dish to cook.

1. Cut tofu into medium slices. Fry them with a little oil in the pan till golden brown on both sides. After frying, tofu will be more hard and not easy to be broken during cook.

2. Heat the pan again. SautΓ© a little chopped garlic and ginger till aromatic.

3. Add in black fungus, stir fry for 2 mins.

4. Add in 1/2 tablespoon light soy sauce, 1/2 tablespoon oyster sauce and 1 tablespoon water. Stir well.

5. Put fried tofu back in the pan. Simmer for 2 mins. Let the flavor in.

6. Reduce the sauce with high heat. Add in a little chopped green chili. Fry a bit.

7. Add in a little corn starch water. Stir fry evenly. Season with salt if you need.

Serve hot.

To Make Your Dumplings Lace Skirt

As a native northern Chinese girl, I cannot express how much I love Dumplings in words. My husband is on a trip in China. Everyday he would ask me what I had for each meal. He knows my affection towards dumplings, so he ordered some online. Those dumplings were delivered to me the other day. They taste really good no matter boiled or fried.

One of my hobbies is reading recipes on my phone. There are many cooking apps. I like exploring in different recipes, picking some to try. I just happened to find this interesting recipe to dress dumplings with “lace skirt”. Yes! And I tried it. Just cooking for fun. πŸ™‚

I followed the original recipe:

https://www.xiachufang.com/recipe/102855302/

1. Boil dumplings till cooked. You can also choose to steam them or use the left overs.

2. In a bowl, mix water 40g, flour 5g, and very little salt. Mix well till no lumps.

3. Add 15g oil into the bowl. Mix well.

4. My cooking method is different from the original one: Heat a pan, place dumplings in it. When you hear the sizzling, pour flour water into the pan. Turn to low heat and wait till water dried up. The golden brown “lace skirt” will show up. While original recipe is to cook one by one and the “lace skirt” looks much better.

But mine is really crispy. πŸ™‚

Steamed Ribs with Vermicelli

1. Rinse ribs under water to wash them clean. Soak them in water to let all the blood out. Change water several times till water is clean.

2. Marinate ribs with 2 tsp light soy sauce, 2 tsp oyster sauce, 2 cloves of chopped garlic, 1/2 tsp chopped ginger, 2 tsp sugar and 1 tablespoon corn starch. Mix them all well. Marinate for around 2 hours.

3. Soak vermicelli in water till soft. Cut shorter with scissors.

4. Take the ribs out and put into another bowl. Add in 2 tsp oil, and 1 tablespoon corn starch. Mix well again.

5. Spread vermicelli in a plate. Add in 1 tsp light soy sauce, and 1/2 tsp oyster sauce. Mix with chopsticks.

6. Place ribs over vermicelli. Pour marinade on top.

7. In boiling water and steam for 15-20 mins.

8. Garnish with chopped spring onion.

Shrimp Congee

An easy way to cook congee is putting rice in freezer for overnight.

So on the night before, wash rice, drain them. Put them in a bag. And put into freezer.

The next day. Boil a pot of hot water. No need to thaw the rice. Just put frozen rice in the boiling water. Once the water boils again, turn to low heat. Stir slowly so that rice won’t get burnt at the bottom. Cook for 20-30 mins. Rice will become very sticky and thick. If you want the congee to be very thick, the ratio of rice and water can be 1:10. Actually, my ratio of rice and water is 1:15. As I cook it longer, the congee can be very thick too.

Add in shrimps, cook for 3-5 mins.

Add in vegetables you like, cook for another 3 mins.

Season with a little salt and garnish with chopped spring onion.

Pork With Salted Vegetables ζ’…θœζ‰£θ‚‰ ( Mei Cai Kou Rou)

This is the first time for me to try this dish. Main ingredients for this dish are Mei Cai and pork belly.

Mei Cai is a kind of preserved vegetable. I bought from local supermarket. There is a lot of salt on the surface of Mei Cai. I need to rinse salt off first. Then soak in water. Change water several times till water becomes clean. Drain the vegetable. Squeeze all the water out and chop them.

For the pork part, better choose pork belly in square shape. It will be easier to cut it into thin slices. I only find the rectangle kind. It really takes me some time to cut it.

1. Put pork belly in a pot. Add in enough water. Drizzle a little cooking wine, add in ginger slices and star anise. Turn on the heat. Cook for 15-20 mins or till chopsticks can easily go through the meat.

2. Put the pork belly into a plate. Use toothpick to poke several times on the pork skin.

3. Add in 1 tablespoon dark soy sauce, spread soy sauce all over the pork by hand. Then set it aside. Let the skin dry up.

4. Heat some oil in the pan. Turn to low heat. Put pork in with the skin side down. Be careful. You can put on the lid in order not to get hurt by the hot oil. Fry till the skin turns dark brown. For 3-5 mins.

5. Take the pork out and cut into thin slices. About 8mm-1 cm, I think. I’m really terrible at cutting skills, so my pork are in uneven thickness.

6. In a bowl, mix 1 tablespoon dark soy sauce, 1 tablespoon light soy sauce, 1/2 tablespoon sugar and 2 tsp white pepper powder. Marinate pork slices in mixed sauce for a little while.

7. Heat a little oil in the pan. Add in chopped Mei Cai. Stir fry till aromatic. Pour in the marinade of pork. Simmer with low heat for 3-5 mins.

8. Place pork slices in a bowl, skin side down. Top with all the Mei Cai and sauce in the pan after stir-fry. Press with spatula to flatten the surface.

9. Cover the bowl with aluminum foil. Place on steaming rack. And steam in hot water for 40-60 mins.

10. Pour the Meat gravy into sauce pan. Turn on low heat. Add in a little starch water. Stir till thickened.

11. Put a plate over bowl. Flip upside down. And you will see the pretty pork on top and surrounded by Mei Cai. Drizzle thickened gravy. Garnish with chopped spring onion.

Pork & Green Chili Stir-fry

青怒肉丝 (pork & green chili stir-fry) is one of the most commonly-seen dishes in China. And it’s also very popular in Japan. When I have a bad appetite (which rarely happens) or feel like eating something spicy, this dish always comes to my mind immediately. Everyone has his own pork & green chili stir-fry recipe. And here is how I cook it:

1. Cut pork and green chili into shreds. A sharp knife will do a better job. Pork containing a bit fat is ideal for this dish. Otherwise, the meat will be very dry.

2. Heat oil in the pan. Use middle heat. When oil is hot, add in pork. Quick stir to separate each shred. Also add in a little ginger. Fry till pork turns a little brownish and shiny with the grease.

3. Add in chili. Quickly mix chili with pork. Stir fry till chili’s aroma comes out.

4. Add in a little light soy sauce and sugar. My husband can’t accept too much spiciness. So I added a little sugar.

5. Season with salt. And serve hot.

Steamed Greasy Grouper

1. Sprinkle salt evenly over and inside the grouper.

2. Place several ginger slices in a plate. Then put the grouper over them.

3. Put several tofu pieces in the plate too. It’s optional, if you don’t like tofu, just skip this step.

4. In a small bowl, add in 1 tablespoon cooking wine and 2 tsp oyster sauce. Mix well then pour the sauce over fish.

5. Put plate with fish on steaming rack. In hot water and steam for 12 mins. My grouper is a small one. More time will be needed if the fish is bigger.

6. Take the plate out after steaming. Sprinkle ginger and spring onion shreds over fish.

7. Heat a pan. Add in 1 tablespoon oil and 1 tablespoon sesame oil. When the oil is very very hot, pour it over the ginger, spring onion and the fish. Enjoy the sizzling.