My First Try On Ang Ku Kueh

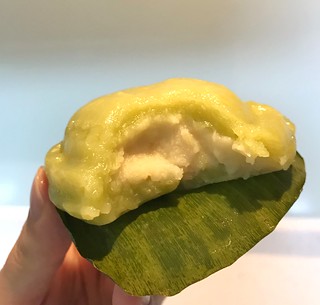
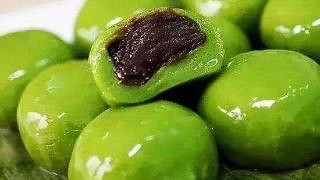
There is a kind of glutinous rice flour ball stuffed with red bean paste or pork floss called 青团 (Qing Tuan) in China. I love it very much.

And it looks like this:

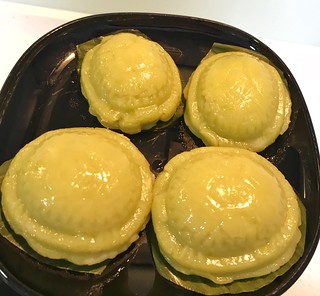
Actually, I love almost all kinds of dessert made from glutinous rice flour. They taste very chewy. I love the texture and the flavor. Too pity, there is no Qing tuan here in Singapore. I only can eat them when I go back to China. Luckily, I found a desert very similar to Qing Tuan. And that is ang ku kueh. I’m very surprised I didn’t try it in the past 3 years. It’s still not too late to find them now. They taste very like Qing Tuan. Filling inside is a bit different. Ang ku Kueh has green bean paste, yam, peanut and coconut. And they have different colors. On the contrary, Qing Tuan only has one color- green. Because Qing means green in Chinese. Tuan means things in ball shape.

My husband is also a fan of ang ku Kueh, Which is very odd, because if he likes ang ku kueh, how come he never suggests me to try this dessert. And of course, he will always say: “I told you. I also bought some for you. You just don’t remember. ” Yo, dude. I may forget things sometimes. But when it comes to food, my memory will be super super good and I can remember super super clear. And the answer is NO! ! ! You didn’t even mention that you like ang ku kueh before.

Anyway, I found this video on YouTube. (My hobby is exploring all the cooking videos online of all cuisine. ):

https://m.youtube.com/watch?v=x3eMO75fBG4

And I tried it. Honestly, I don’t think my ang ku kueh turn out very good. A little softer than I expected. But they taste ok. My husband still likes them. One mystery about my ang ku kueh is that why the pattern and word on the mould disappeared while it was supposed to show on the ang ku kueh clearly. 😦

https://flic.kr/p/2cU1BMZ

I guess I will need to improve it next time.

Teriyaki Chicken Pizza Recipe

1. For the pizza dough, please check:

https://foodrecipe33.com/2018/04/10/double-cheese-pizza-with-homemade-pizza-sauce/

2. Prepare a whole boneless chicken leg. Cut it into small chunks.

3. Heat a pan. Add in a little oil. Sear the chicken till brownish.

4. Add in 1 tablespoon light soy sauce, 1/2 tablespoon mirin (Japanese sweet cooking wine), 1/2 tablespoon dark soy sauce, 1 tsp sugar, 1 tablespoon honey. Mix chicken well with sauce.

5. Pour in 1 cup hot water. Simmer chicken for 10 mins.

6. Set chicken aside. Turn to high heat. Reduce the sauce till very thick. You can add in a little starch water to help. The. The teriyaki sauce is done.

7. Brush pizza dough with teriyaki sauce. Sprinkle cheese. Then chicken and vegetable. At last another layer of cheese.

8. Into 200 degree C oven for 10 mins or till cheese melts.

https://flic.kr/p/2bAXhf9

My First Try On Nasi Lemak

Nasi Lemak is a Malay dish. When I first came to Singapore, I tried it. But didn’t have any deep impressions on it. The specialty of it lies in rice, which is cooked with coconut milk. But when I had it before, rice was cold, so I couldn’t taste the fragrance of coconut milk.

The other day, I tried cooking rice with coconut milk, the rice turned out very nice. So I bought pandan leaves, lemon grass, sambal chili sauce and decided to cook my first nasi lemak.

Rice part:

1 cup rice ( I used the ones with some brown rice mixed in)

70 ml coconut milk

1 1/2 cup water

1 stalk pandan leave (make into a knot)

1 stalk lemon grass (pat lightly with knife)

1/2 tsp salt

Put all the ingredients above into rice cooker and press the cooking bottom. Trust me your kitchen will smell so so good.

For side dish, I chose to fry yellow strip fish (kuning) and chicken wings. Also served with peanuts, anchovies, egg and cucumber.

Place Yellow strip fish in a bowl, sprinkle salt and white pepper.

Put chicken wings in a big bowl, add in 1/2 tsp salt, 1/2 tsp whit pepper, 1/2 tsp chili powder, 1/2 tsp ground ginger, 1 tablespoon corn starch, 1 tablespoon rice flour and 50 ml coconut milk. Mix well and marinate for a little while.

1. Heat a lot oil in the frying pan or pot. Add in dried anchovies, fry till golden brown. Dish them out. Fry peanuts till aromatic and brownish.

2. Fry yellow strip fish with low heat. Dry the fish before frying. Be careful of the hot oil. Frying fish till bone is also crispy. (My husband loves crispy fried yellow strip fish).

3. Last fry chicken wings. Also use low heat. Fry chicken till golden brown.

Spread a banana leaf over the plate. Place rice in the middle.

Around rice, place fried fish,

https://flic.kr/p/2cPzf4d

fried chicken wings,

peanuts, anchovies,

boiled (or fried ) egg, cucumber slices and don’t forget the sambal chili sauce.

https://flic.kr/p/2bMY2ou

Serve hot. That’s also very important.

Here is the first nasi lemak I cooked. My husband was astonished when I brought the plate in front of him. He loves it very very much. He said it’s the best nasi lemak he ever had. 🙂

https://flic.kr/p/2bMY2pS

I also love it. Now I finally realize why nasi lemak is a popular dish here in Singapore. Rice is very rich, full of coconut fragrance. I just can’t stop having it. I also very like sambal chili sauce. It’s very different from Chinese mala chili sauce. It tastes a bit sweet and its spicy is perfect. I also ate all the sambal chili sauce on the plate. 🙂

Recipe: Crab & Vermicelli

Vermicelli is a good match for many vegetables and seafood.

1. Soak vermicelli in water for several mins or till it becomes soft. Cut a bit with scissors. Drain them.

2. Clean the crab. Take off the shell. Remove the intestine. And cut into smaller parts.

3. Place crab pieces in a bowl. Add in 2-3 tablespoon corn starch. Shake a little bit to let crab be coated with starch.

4. Heat a pan. Oil in. Fry crab till golden brownish. Take them out.

5. Heat the same pan. Add a little extra oil if needed. Add in chopped garlic and ginger. Sauté till aromatic.

6. Put the crab back in. Pour in 1 tablespoon cooking wine, 1 tablespoon light soy sauce, 1/2 tablespoon oyster sauce, 1 tsp sugar. And enough water covers all ingredients.

7. Cover the lid. Simmer with low/medium heat for 15 mins.

8. Add the soaked vermicelli. Mix vermicelli with sauce and crab for about 3 mins.

9. Season with salt. Garnish with spring onion.

Pork Floss & Spring Onion Bun

I made pork floss the other day, and the idea of making pork floss & spring onion bun came to me. I don’t have much experience of making bread. So I search on YouTube and found this video:

I just followed this recipe.

If you want to make pork floss at home, you can please refer to my previous blog:

Homemade Pork Floss

For those who cannot read Chinese, I can help to do some translation:

Ingredients for bread

salt 2g

sugar 10g

yeast 4g

egg 1

butter 20g

bread flour 230g

water 100g

  1. dissolve yeast in warm water and rest for 10 mins.
  2. Mix all dry ingredients.
  3. Combine all ingredients above except butter till it become a dough.
  4.  Cut butter into the dough. Two options: bread machine or by your hands. I knead the dough by my hands. I was kneading it and watching a TV drama at the same time. The whole kneading process last for 1 and a half episode.
  5. Place the dough in a bowl, cover with plastic warp and let it rise till 2 times big.
  6. Flatter it into a disc. Put it into a 27×27 baking pan.
  7. Place the baking pan into oven, with a big bowl of hot water underneath. Let the dough rise again till 2 times big.
  8. Preheat oven to 180 degree c.
  9. Brush dough with egg. Sprinkle white sesame and spring onion (green part).
  10. Into the oven and bake for 12 mins.
  11. Cut bread into squares or whatever shape you like.
  12. Take two pieces of them. Brush the back with mayonnaise. Sprinkle a little pork floss. Stick them together. Then brush the edges with mayonnaise, dip in pork floss.

https://flic.kr/p/2cxLaFi

I was very generous with pork floss and used all the pork floss I made before. I have to admit that my bread is not so soft as the ones sold in bakery shop. My husband still like them though.

Healthy Bean Soup

It’s a soup made of different kinds of beans. It’s very healthy.

There was a period of time, I cooked regularly. My husband’s grey hairs became much less. Recently, I decided to cook it again.

Main ingredients are beans. I measured with my own hands.

Ingredients:

A handful of Red beans

A handful of Kidney beans

A handful of red kidney beans

Half handful of Barley

Soak all the ingredients above for overnight. Barley belongs to cold food, so it should’t be used less.

When cook it, also add in

Half handful of black sesame

Half handful of walnut

6-8 red dates (cut a bit)

Some Chinese yam (Huai Shan, peeled and chopped)

Black sesame is good for hair. Walnut is good for brain. Red dates are good for skin.

Put all ingredients in a deep pot. Pour in enough water, cos it will take at least 2 hours.

My husband hates the beans. He just eats walnut, Huai Shan, drink the soup and leave all the beans. So I put a lot of water into the pot. Otherwise, the soup will be very thick. Of course, if you are Ok with it, you can add less water.

I cooked it for 3 hours. If you want it to taste sweet, you can add in sugar.

Chicken Shrimp Wanton Soup Recipe

My husband is big fan of Wanton noodles. When we were in a short trip in Penang, we had very nice wanton noodles at a street stall. He seemed to be addicted to wanton noodles. So after we came back in Singapore, I think I can work a bit on wanton recipe.

This time, I used minced chicken instead of minced pork.

For wanton filling:

Minced chicken 200g

shrimps (no shell) 200g ( I put at least 1 whole shrimp in each wanton. You can coarsely chop the shrimps and use less)

Shiitake Mushroom 4 chopped

Water chestnuts 8 ( 3 were blended into paste and the other 5 are chopped into coarse mince)

Chopped ginger 1/2 tsp

Five spice powder 1/2 tsp

Light soy sauce 1 tsp

Salt 1 tsp

Oyster sauce 1 tsp

Black pepper 1/2 tsp

Water 1 tablespoon

Mix all the ingredients above in a big bowl. Stir with chopsticks to combine them all.

Wanton wraps were bought from supermarket.

These are the wantons I made them in gold nugget shape. I made many and put them in a box then put into freezer. So it will be convenient when my husband wants to have wanton. Just take them out from fridge and boil for 8 mins.

Boiling them needs about 8 mins. Place them in chicken soup ( which was made by a whole chicken leg and simmered for at least 30 mins). Garnish with chopped spring onion.

https://flic.kr/p/QoxupL

You can see the shrimp inside. Soup is also very nice.

This recipe also works without shrimps. Under this circumstance, If you have wanton fillings left, you can use the left to cook meatball with running egg:

https://foodrecipe33.com/2018/11/09/meat-ball-with-running-egg/

Meat Ball With Running Egg

When I made wantons in the morning, some filling was left. And I didn’t have any plan to make more wantons, so I used those left minced chicken filling to cook this dish. I know there is a Scotch Egg. But I kind of cook it in a different way, especially the meat part. So I just called it “Meat Ball With Running Egg”. 🙂

Original wanton filling is : 200g minced chicken, 5 chopped Shiitake mushroom, 4 chopped water chestnuts, 1 tablespoon light soy sauce, 2 tsp oyster sauce, 1 tsp salt, 1 tsp black pepper, 1/2 tsp minced ginger.

There was about 1/4 left. To add more flavor to the meat part, I also add in 2 tablespoon shredded mozzarella cheese, and 1 tablespoon chopped spring onion.

For the running egg. Boil some water ( doesn’t need to cover eggs, because eggs can be steamed too). When water boils, add in eggs. Cover the lid for 5 mins. Mine are cooked for 5 mins. If you want egg yolk to be more solid, you can cook 1-2 mins longer. Soak them into icing cold water immediately. Later remove the shell.

Divide meat into two balls. Place one meat ball on a plastic wrap, cover it with plastic. Use a rolling pin or palm to flatten it into a disc. Place egg in the center. Gently wrap egg with meat. Twist plastic wrap to make it into ball shape.

Roll meat ball in bread crumbs. Deep fry for about 5 mins or till golden brown.

Cheese is actually not a good choice to add in. Because when cheese melts, it leaks out easily. And the meat ball will stick to the bottom of frying pot. I have to be very very careful to separate meat ball from the pot. But, this dish is still very nice.

Look at these round and fat meat balls. Here comes the best part. Just take a knife and cut it into halves. Wow, running egg yolk burst out. YUM!

My husband loves it very very very very much. He said this dish combined egg and meat, it’s literally combined his two favorite ingredients.

Deep Fried Mushroom

Hmmm. I am crazy addicted to mushroom. Mushroom is a must-have thing in my fridge. My husband likes them too, but definitely not as crazy as I do. Fried mushroom is a dish he likes very much. Yet, he only had them in restaurant and usually a small portion of fried mushroom will cost S$ 6+. If cooked at home, this dish is much cheaper.

And last time, when I cooked fried chicken followed YouTube’s NO 1 video, there was some flour and sauce left. I try to avoid wasting any ingredient in my kitchen. Fried mushroom came to my head. That sounds a good idea. So i used left ingredients to make this dish.

https://flic.kr/p/2cGKZ6g

Ingredients I used is the leftover of fried chicken. You can please check my previous blog:

https://foodrecipe33.com/2018/11/06/my-experiment-on-fried-chicken-followed-youtubes-no-1-fried-chicken-recipe/

1. Beat 1 egg in a bowl, add in 3 tablespoon water and 1/3 cup chili sauce.

2. Add in 1/2 cup flour, 1 tsp black pepper, 1 tsp paprika powder, 1 tsp salt and 1 tsp garlic powder. Mix them well till smooth and no flour lumps.

3. Cut mushrooms into halves. Here I used Shiitake mushroom.

4. Dip mushroom in the batter first, then roll in bread crumbs. Shake off the excessive.

5. Deep fry till golden brown.

They are really crispy and tasty. You can serve it with mayonnaise.

My Experiment On Fried Chicken Followed YouTube’s NO. 1 Fried Chicken Recipe

Recently, my husband kept telling me to cook less food each meal cos he’s on a diet. And today, when I asked him what he wanted for lunch. He told me he wanted FRIED CHICKEN!!! 😅Hey Dude, aren’t you on a diet?!

I searched fried chicken recipe on YouTube, and this video came out as the top on the list:

I kind of doubted it at the beginning. It’s very different from the way fried chicken I used to do. Especially when I saw mixing hot chili sauce with water and eggs. I was like NO kidding!

But I think that video ranked NO.1 for a reason. Julia Child said :”Learn how to cook — try new recipes, learn from your mistakes, be fearless, and above all have fun!” I always encourage myself to be bold and fearless in kitchen. I was willing to give it a try. The worst result could be that I got terrible fried chicken, but I knew for sure my husband would still like them. He loved almost every dish I cooked. Yeah, he has GREAT taste. 🙂

I cut all ingredients into 1/3 of original, cos I only cooked 4 chicken drumstick. This is how my fried chicken look like. Two of them are very dark colored. That’s because when I tried to measure the oil temperature with thermometer, I found there’s something wrong with thermometer. It didn’t show the number. I turned it on and off several times. When I was struggling with it, I forgot the oil is still on the stove, heating. I finally gave up using thermometer. But then the temperature was a bit high. And the chicken turned out very dark. I turned off the heat for the second batch. It turned out great. The fried chicken was so good. My husband was like “Tai Hao Chi Le” (very delicious). 🙂 The chicken is very tender and juicy. I will definitely cook fried chicken using this method in the future.

There were some flour and sauce left. I used them to cook fried mushroom. Super yummy too. I will explain how I cooked them in next blog. 🙂

Cooking & Food & Recipes & Life