Tag Archives: recipe

Tomato Sauced Chicken Chop

When I am in a rush or just feel lazy, I always make chicken chop or pork chop for lunch. They are very easy and not time-consuming and perfect to go with rice or pasta. Simple and quick! My husband is not picky about food. As long as there is meat or egg, he will be very happy. πŸ™‚

1. Cut one whole chicken breast into halves. Use a knife to cut several times horizontally and then vertically. Don’t cut them through. Just make several light cuts, so chicken won’t shrink during frying.

2. Sprinkle salt and black pepper over both sides.

3. Prepare 1/2 cup flour, mix with one pinch salt and one dash black pepper. And one beaten egg in another bowl.

4. Roll chicken in flour then dip in egg then flour again. Deep fry till golden brown.

5. Heat a pan, cut in 1 tablespoon butter. When butter melts, add in 1 tablespoon flour. Stir them well and add in 1 tablespoon tomato sauce. Mix them well. Pour in 1/4 cup water or stock. Also add in 2 tsp sugar to balance the sour taste of tomato sauce. Reduce sauce to condensed. Pour over chicken chop.

Actually, sauce also makes pasta tasty and yummy.

https://flic.kr/p/2bmXExH

Honey Garlic Chicken

My husband calls all meat with dark sauce “Teriyaki”. I found it because 2/3 of times when I asked him what he wanted for lunch, his answer would be ” teriyaki chicken or teriyaki pork”. He doesn’t pay much attention to how I cook the meal or sometimes I doubt he even doesn’t know what I feed him. :p

This dish is not difficult to cook.

1. Prepare chicken. I used cutter half chicken. You can use chicken drumstick, wings or thighs. Sprinkle salt and pepper over both sides.

2. Heat a pan. Add in 1 tablespoon oil. Fry chicken till golden brown skin.

3. Add in 3 tablespoon chopped garlic. Stir fry till aroma. Then add 1/4 cup honey. Stir well.

4. Add 1/4 cup chicken stock, 2 tablespoon vinegar, 1 tablespoon light soy sauce and 1/2 tablespoon dark soy sauce. Mix well. Cove the lid and simmer for 15-20 mins.

5. Turn up the heat and reduce the sauce. Sprinkle a little white sesame.

Garnish with chopped spring onion before serving. Perfect to go with rice.

Xun Yu 熏鱼 Recipe

It’s a classic Shanghai dish.

1. Prepare a fish or fish fillet. Cut into slices about 1.5-2 cm thick.

2. Place fish slices in a bowl. Marinate with cooking wine, ginger slices and chopped spring onion.

3. Drain the fish. Pat them with kitchen towel. Cos next step is to deep fry them. If fish has water on it, the kitchen will become a dangerous war zone.

4. Deep fry the fish with medium low heat. This step needs a bit patience. Fish after frying should be crispy.

5. Prepare the sauce. Authentic Xun Yu needs a big pot of sauce. But I really don’t know how to deal with so much sauce. So I decided to make only a little sauce. Heat a sauce pan. Add in 1 tablespoon cooking wine, 2 tablespoon light soy sauce, 2 tablespoon sugar, several ginger slices. Heat to reduce the sauce a bit.

6. Put the fried fish in. Roll it in the sauce and quickly take it out. If it stays long in sauce, it won’t be crispy.

Pumpkin & Sausage Linguine

Yes, I know! The color of this dish looks so weird. :p

1. Cook linguine. Drain and cool down. Set aside for later use.

2. Boil pumpkin in water till cooked.

3. Mash pumpkin in a bowl. If you want it to be very smooth, you can use a blender.

4. Heat a little oil in the pan. Fry sausage slices till a little brownish.

5. Add in chopped garlic. Stir fry till aromatic.

6. Add in mashed pumpkin and 1/4 cup water or stock. Simmer for a little while. If you want it to taste more creamy, you can also add 1-2 tablespoon cream or cheese.

7. When soup reduces, add in cooked linguine.

8. Sprinkle mixed herbs. Mix well.

9. Season with salt and black pepper.

Sweet & Sour Cuttlefish Recipe

Every time when my husband and I went to shopping for grocery, we would stay at the seafood are for a little while discussing what kind of fish we need to buy. Most time, we bought salmon, which is easy to cook and hard to get it done in a terrible way. We seldom bought shell or cuttlefish. Only when I have a new recipe to try that will I buy those I rarely choose.

I think cuttlefish can be fried with crispy shell. If they got coated with sauce, it will be nice. That’s how I got the idea of making this dish.

1. Cut cuttlefish into medium pieces. I was planning to have cuttlefish rings, but the one I bought already got cut open. So I just cut it into strips.

2. Place cuttlefish into a bowl. Sprinkle a little salt and black pepper.

3. In another bowl, combine 50g flour, 50g corn flour, 1 tsp salt, 1 tsp black pepper. If you want it to be spicy, you can also add in chili powder. Mix them well.

4. Dip cuttlefish into the flour and shake off the excessive.

5. Deep fry them till the shell becomes hard and golden. Cuttlefish tastes really good after frying. I can’t help having some of them and also feed my husband a little. He likes it. Really crispy and tasty.

6. Heat a pan. A little oil in. SautΓ© chopped ginger and garlic till aromatic.

7. Add in 1 tablespoon sugar and 1 tablespoon vinegar. Stir to dissolve the sugar. When the sauce condensed, add in fried cuttlefish, green chili & spring onion shreds.

8. Quickly stir fry to let cuttlefish be coated with sauce. And ready to serve.

Crispy cuttlefish is coated with sweet and sour sauce. Very yummy.

https://flic.kr/p/2ctikFs

Bacon Asparagus Roll

This dish just came to me when I searched fridge trying to figure out what to cook for lunch. I happened to see bacon and asparagus, and they were waving hands to me. So I decided to eat them.

1. Wash asparagus under water. Remove the bottom. Peel the skin near bottom off.

2. Bleach in boiling water for 3 mins. Don’t forget to add in a little salt in the boiling water.

3. Place asparagus in cold water then drain them.

4. Roll asparagus in a piece of streaky bacon from one end to the other. Roll it tight or it will loose while frying.

5. Heat a pan, add in 1 tablespoon oil. Fry bacon roll with medium or low heat. Roll it to let it be fried evenly.

6. When bacon turns beautifully lightly brown, sprinkle in black pepper.

Scrambled Egg With Luffa & Black Fungus

I have been in Singapore for over 3 years. Sometimes when I was shopping for groceries in supermarket, I wondered why there is no luffa here. And one day, I saw a strange long Gourd with ridges around it. I picked it up and saw the name “luffa”. Then I realized, luffa here is very different from the luffa in my hometown.

This the the one I saw in my hometown:

This is the one I saw here in Singapore:

They look different, but they can be cooked in same way.

1. Wash the luffa and peel it. Cut it into wedges.

2. Soak dried black fungus in water for about 3 mins. Remove the bottom. Then tear into smaller pieces.

3. Beat 3 eggs in a bowl. Also prepare a little ginger shreds.

4. Heat a pan. Add in 1 tablespoon oil. When oil is heated, pour egg in. Don’t stir till the bottom solidifies. Use chopsticks to stir eggs. Dish them out once almost cooked.

5. Use the same pan. Add in a little extra oil if needed. Add in luffa, stir fry for 1 min. Then add in black fungus and stir fry for 2 mins.

6. Pour in 1/4 cup hot water. Place ginger shreds over top. Cove the lid and simmer for 2 mins.

7. Remove lid. Turn to high heat. Add in scrambled egg. Quickly stir fry evenly and season with salt.

Serve hot.

My First Try On Ang Ku Kueh

There is a kind of glutinous rice flour ball stuffed with red bean paste or pork floss called 青囒 (Qing Tuan) in China. I love it very much.

And it looks like this:

Actually, I love almost all kinds of dessert made from glutinous rice flour. They taste very chewy. I love the texture and the flavor. Too pity, there is no Qing tuan here in Singapore. I only can eat them when I go back to China. Luckily, I found a desert very similar to Qing Tuan. And that is ang ku kueh. I’m very surprised I didn’t try it in the past 3 years. It’s still not too late to find them now. They taste very like Qing Tuan. Filling inside is a bit different. Ang ku Kueh has green bean paste, yam, peanut and coconut. And they have different colors. On the contrary, Qing Tuan only has one color- green. Because Qing means green in Chinese. Tuan means things in ball shape.

My husband is also a fan of ang ku Kueh, Which is very odd, because if he likes ang ku kueh, how come he never suggests me to try this dessert. And of course, he will always say: “I told you. I also bought some for you. You just don’t remember. ” Yo, dude. I may forget things sometimes. But when it comes to food, my memory will be super super good and I can remember super super clear. And the answer is NO! ! ! You didn’t even mention that you like ang ku kueh before.

Anyway, I found this video on YouTube. (My hobby is exploring all the cooking videos online of all cuisine. ):

https://m.youtube.com/watch?v=x3eMO75fBG4

And I tried it. Honestly, I don’t think my ang ku kueh turn out very good. A little softer than I expected. But they taste ok. My husband still likes them. One mystery about my ang ku kueh is that why the pattern and word on the mould disappeared while it was supposed to show on the ang ku kueh clearly. 😦

https://flic.kr/p/2cU1BMZ

I guess I will need to improve it next time.

Teriyaki Chicken Pizza Recipe

1. For the pizza dough, please check:

https://foodrecipe33.com/2018/04/10/double-cheese-pizza-with-homemade-pizza-sauce/

2. Prepare a whole boneless chicken leg. Cut it into small chunks.

3. Heat a pan. Add in a little oil. Sear the chicken till brownish.

4. Add in 1 tablespoon light soy sauce, 1/2 tablespoon mirin (Japanese sweet cooking wine), 1/2 tablespoon dark soy sauce, 1 tsp sugar, 1 tablespoon honey. Mix chicken well with sauce.

5. Pour in 1 cup hot water. Simmer chicken for 10 mins.

6. Set chicken aside. Turn to high heat. Reduce the sauce till very thick. You can add in a little starch water to help. The. The teriyaki sauce is done.

7. Brush pizza dough with teriyaki sauce. Sprinkle cheese. Then chicken and vegetable. At last another layer of cheese.

8. Into 200 degree C oven for 10 mins or till cheese melts.

https://flic.kr/p/2bAXhf9

My First Try On Nasi Lemak

Nasi Lemak is a Malay dish. When I first came to Singapore, I tried it. But didn’t have any deep impressions on it. The specialty of it lies in rice, which is cooked with coconut milk. But when I had it before, rice was cold, so I couldn’t taste the fragrance of coconut milk.

The other day, I tried cooking rice with coconut milk, the rice turned out very nice. So I bought pandan leaves, lemon grass, sambal chili sauce and decided to cook my first nasi lemak.

Rice part:

1 cup rice ( I used the ones with some brown rice mixed in)

70 ml coconut milk

1 1/2 cup water

1 stalk pandan leave (make into a knot)

1 stalk lemon grass (pat lightly with knife)

1/2 tsp salt

Put all the ingredients above into rice cooker and press the cooking bottom. Trust me your kitchen will smell so so good.

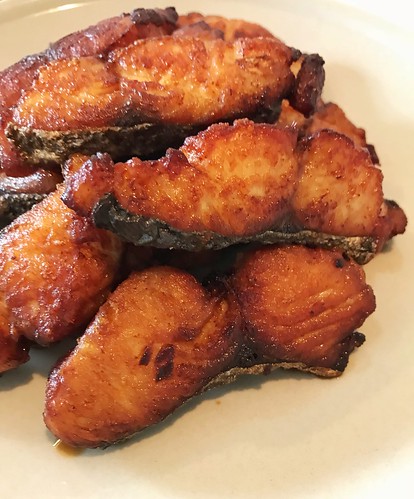
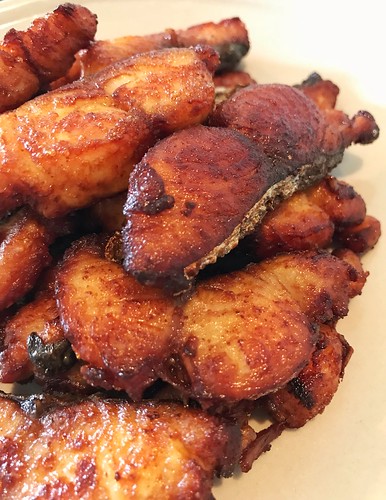
For side dish, I chose to fry yellow strip fish (kuning) and chicken wings. Also served with peanuts, anchovies, egg and cucumber.

Place Yellow strip fish in a bowl, sprinkle salt and white pepper.

Put chicken wings in a big bowl, add in 1/2 tsp salt, 1/2 tsp whit pepper, 1/2 tsp chili powder, 1/2 tsp ground ginger, 1 tablespoon corn starch, 1 tablespoon rice flour and 50 ml coconut milk. Mix well and marinate for a little while.

1. Heat a lot oil in the frying pan or pot. Add in dried anchovies, fry till golden brown. Dish them out. Fry peanuts till aromatic and brownish.

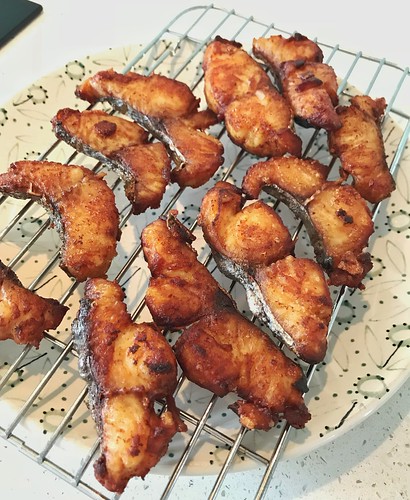
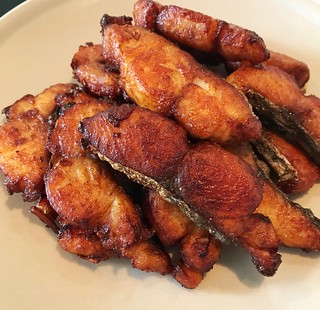
2. Fry yellow strip fish with low heat. Dry the fish before frying. Be careful of the hot oil. Frying fish till bone is also crispy. (My husband loves crispy fried yellow strip fish).

3. Last fry chicken wings. Also use low heat. Fry chicken till golden brown.

Spread a banana leaf over the plate. Place rice in the middle.

Around rice, place fried fish,

https://flic.kr/p/2cPzf4d

fried chicken wings,
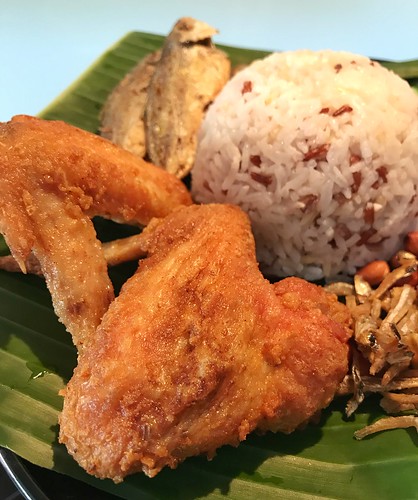
peanuts, anchovies,

boiled (or fried ) egg, cucumber slices and don’t forget the sambal chili sauce.

https://flic.kr/p/2bMY2ou

Serve hot. That’s also very important.

Here is the first nasi lemak I cooked. My husband was astonished when I brought the plate in front of him. He loves it very very much. He said it’s the best nasi lemak he ever had. πŸ™‚

https://flic.kr/p/2bMY2pS

I also love it. Now I finally realize why nasi lemak is a popular dish here in Singapore. Rice is very rich, full of coconut fragrance. I just can’t stop having it. I also very like sambal chili sauce. It’s very different from Chinese mala chili sauce. It tastes a bit sweet and its spicy is perfect. I also ate all the sambal chili sauce on the plate. πŸ™‚