Tag Archives: food

Beef Wellington


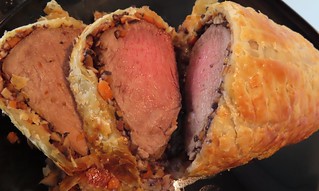
It just came to me that there was still a piece of beef fillet in my fridge last night, so I decided to cook beef wellington today.

Main Ingredients:

beef, chopped shiitake mushroom & carrot (of course you can use the help of a blender), puff crust, salt, and pepper.

1, Sprinkle salt and pepper over the fillet. Rub a bit with hands.

2, Heat a pan, add in some oil. Fry beef fillet till each side turns brownish.

3, Beef fillet in a plate and rest for a while. Use the same pan to fry mushroom and carrot. When the juice comes out, drizzle in a little red wine. (I just want to add a little flavor, if you don’t have red wine, you can just skip this step.) Add in a little dried thyme. Turn to low heat and simmer for a little while. Season with salt.

4. Many chiefs cook beef wellington use ham. Yet, I don’t have . So I just go with my no-ham version. Place a piece of plastic wrap on the table. Pastry crust on it. (I just don’t have crust, so I use Roti Prata instead. Because I tried to use Roti Prata pasty in Apple pie before, and it turned out great. So Roti Prata is always a good replacement of pastry crust to me.)

5. Spread mushroom and carrot on the pastry evenly. Beef in the middle. Roll one end of pastry to the other gently. Tuck in the two sides. Twist a bit with the help of plastic wrap. In the fridge for 30 mins.

6. Preheat oven to 200 degree C.

7. Egg wash the pastry. Cut several lines or any pattern you like.

8. Into the oven for 20-25 mins or till the pastry turns golden color.

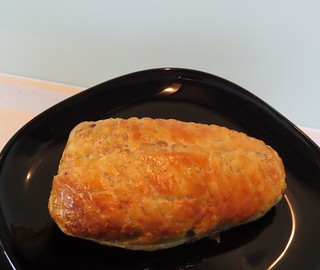
Cut it with a very sharp knife. Because the crust is really easily broken. A sharp knife will do a better job. Or you may get your beef wellington just like mine. 😦

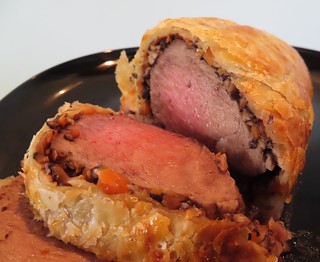
Very fragile out layer. But the taste is super.

Corn Soup

1. Cut all the kernels from a fresh corn.

2. Put corn in a pot. Add in 1/2 cup milk. Bring to boil then turn to low heat and simmer till corn is cooked.

3. Pour all the corn with milk into a blender. Blend till smooth.

4. Pour back to pot. Turn to low heat. Keep stirring while heating. Bring soup to boil again.

5. Season with salt and pepper.

Probably the Best Yong Tau Foo I’ve Ever Had

Yong Tau Foo is a Hakka Chinese cuisine. Yet, I have never tried it in China before. Yong Tau Foo stall is quite similar to Chinese spicy hot pot (malatang). All the meat, vegetables and seafood are displayed on shelves. Customers can choose whatever they want to add in their Yong Tau Foo. The main difference I guess lies in cooking method. Malatang (éŗ»č¾£ēƒ«ļ¼‰ includes 3 Chinese words. éŗ» (ma)means numb, it refers to the feeling caused by pungent spices like Sichuan pepper corn. 辣(la)means spicy, it refers to chili, chili powder and chili oil. 烫(tang)means hot. Because malatang is always served very hot. I still remember when I had social linguistic class, my teacher taught us malatang could be translated as “3 hots”: hot, hot, hot. šŸ™‚

I have tried Yong Tau Foo several times after I came here. Since I really missed malatang and I couldn’t find it here in Singapore ( now I can find some). And also because I can choose my favorite vegetables to make my unique Yong Tau Foo.

Today, out of some reasons, my husband took me to Rochor. We have a habit. Whenever we go to some place we don’t often go to, we search good food there. And we call it “food hunting”. Google map told us there is a good hawker center “Albert Center”. How we decide which stall to try is very simple. We just observe which stall has a long queuing line. And this stall definitely has the longest line in front of it.

There is only ā€œē™¾å¹“ā€ (a hundred years old) on the signboard. We were very curious and found it a Yong Tau Foo stall. Why are so many people waiting there? We wanted to figure it out. And my husband queued, I went to find a seat. And wait, and wait and wait……

And here finally comes the Yong Tau Foo.

This one is different from the ones I had before. This stall doesn’t have shelves with meat and vegetables on it. Their set contains soup, glass noodles, tofu, fish cake, shrimp, meatball and bitter gourd. The first sip of soup really amazed me.

Soup is light, but also tastes a bit sweet. Tofu is so fatty and juicy. Both my husband and I couldn’t resist the soup.

And fried chicken is also included in the set.

Crispy shell, tender and juicy meat.

Whole set is S$5.80. Totally worth it.

My husband told me Rochor is famous for beancurdĀ  dessert. Since we don’t come here often, we definitely need to try the beancurd.

We chose this stall. My favorite is red bean. too bad, red bean is sold out. So we tried Lotus ginko beancurd.

We loved it!!!

Steak & Portobello Mushroom

This is the first time for me to cook Portobello mushroom. They are really big and look like a giant brown umbrella.

For steak:

1. Season both sides with salt and black pepper.

2. Heat a pan. A little oil in. Sear the steak for about 3 mins.

3. Flip the steak over. Cut in a cube of butter. And add in 2 cloves of garlic and dried thyme (fresh thyme will be better, but I didn’t have any at that time).

4. Fry for about 3 mins. Use a spoon, to scoop better and spread over steak. Sear the edge side too.

Steak in the plate and rest.

To cook Portobello mushroom:

Remove the Portobello mushroom’s stem first and wash clean.

1. Heat a pan. Cut in a small cube of butter.

2. When butter melts, add the mushroom in with cap side down. Sear for 3 mins. If your mushroom is really really big, probably you will need 5 mins. Keep the heat low, don’t burn the mushroom.

3. Add 1 drop of soy sauce onto the stem hole of each mushroom.

4. Flip the mushroom over, sear the other side for 3 mins with the lid on.

5. A lot of juice will come out. Use a spatula, and press the mushroom gently to squeeze the juice out.

6. Flip over and squeeze the other side. Keep cooking till the juice evaporates.

Serve steak with mushroom.

Mushroom is really juicy and tender. Portobello Mushroom just became my husband’s favorite mushroom. He couldn’t stop saying “delicious”. šŸ™‚

Cod Fish Fillet

My husband loves fish, especially fish from the deep sea. We often buy salmon. We don’t buy cod fish that often. Last time when we went out shopping for groceries, he saw the frozen cod fish fillet. He asked if he could buy some. I was a bit hesitant because I didn’t cook cod that much. He told me just to cook it in the same way of cooking salmon. OK, then. My husband always tells me to cook seafood in a simple way with less condiments, even though he almost never cooks.

As he said, I just pretend I am cooking a salmon fillet.

1. Season cod fillet with salt and pepper.

2. Heat a pan, drizzle in a little oil. When pan is hot, place cod fillet in.

3. Sear the cod fillet for 3-4 mins. Then flip over. Sear for another 3-4 mins. I also added in a clove of garlic. Fry both sides till a bit brownish.

4. Don’t forget to sear the edge side of fillet. Fry each side for another minute at last.

Please be gentle while cooking cod fish. I guess I was too careless, I kind of broke the fish. 😦

Well, my husband still loved it.

Oven-roasted Tomatoes

Recently, I’m crazy about tomatoes. I always want to try sun dried tomato, yet weather here in Singapore is very humid. So I guess sun dried tomato is impossible here. Then this oven-Roasted tomatoes came to my head.

And it’s very easy.

1. Chop tomatoes into slices (around 0.5cm thick). You can use cherry tomatoes or any ones of small size.

2. Place all tomato slices in a big bowl. Drizzle in olive oil, spread a little salt and add in dried herbs you like. I used dried oregano. Toss a bit.

3. Put tomato slices in baking tray and arrange them in one layer. You can put them very close to each other. Because they will shrink after dehydrated.

4. Preheat oven to 200 degree C. Roast tomato for 15-20 mins or till they get wrinkled and a bit burnt on the edge.

They can be used in Spaghetti or pizza or salad. I’m a big fan.

Roasted Chicken That I Have No Idea How Many Times I have Tried

I have tried roasted chicken in many different ways so many times that I cannot even count.

But I guess as long as my husband loves roasted chicken, I will never stop my way of exploring. Since he will never be fed up with roasted chicken, so I guess I will just keep on trying.

1. Prepare herbs, I chose rosemary and thyme. You can also use fresh herbs.

2. Stuff a pieces of butter under the skin on chicken’s breast with chopped herbs.

3. Sprinkle salt and olive oil all over the chicken and inside too.

4. Preheat oven to 200 degree C.

5. Place chopped onion in the baking tray.

6. Place a lemon inside the chicken. Tie the chicken with kitchen twine.

7. Roast chicken for 50-60 mins.

Chicken will be beautifully brownish colored. Remove the kitchen twine. Cut chicken into pieces. Squeeze lemon to let lemon juice with juice in the tray. Heat a bit to reduce sauce. Drizzle sauce all over the chicken.

https://flic.kr/p/29nWr19

Cabbage Chicken Roll

1. Prepare fillings:

Minced chicken 100g (u can also use minced pork or beef)

1/2 diced onion

2-3 chopped Shiitake mushroom (optional)

Salt and pepper

Mix all the ingredients well in a bowl.

2. Prepare 6 -8 cabbage leaves.

3. Soak cabbage leaves in hot water till softened.

4. One roll needs 2 cabbage leaves. Place 1 cabbage leaf on the table. Put a spoonful filling at one end. Then roll to the other end. Put the roll on one end of another cabbage and roll again. I made 3 big rolls with 6 cabbage leaves. You can also make it into 4 small ones.

5. For the sauce, I made from fresh tomato. You can also use canned tomato chunks.

Cut a cross at the bottom of tomato (2 medium ones). Soak in hot water for a little while. Peel them off. Chop into small chunks.

6. Heat a pan or a pot. Add in a little oil. SautƩ 2 chopped garlic. Add the tomato in. Sprinkle a little salt. Stir fry till softened and juice comes out. Add in 1 tablespoon tomato sauce and 1/2 tablespoon sugar to balance the sour taste. Also add in a little dried oregano or herbs you like.

7. Pour in 1/4 cup water. Stir well.

8. Place cabbage rolls in. Turn to low heat. Cover the lid. Simmer for 10 mins.

9. Flip the rolls over. And simmer for another 5-8 mins.

10. Season with salt and pepper.

I think it will go well with pasta.

Flat Garlic Bread

1. Dissolve 1 tsp yeast and 1 tsp sugar in 1/4 cup warm water. Let it ready for 5 mins.

2. Mix 1 cup flour, 1 pinch salt, 1/2 tsp dried oregano, 1 tsp butter and 3 cloves chopped garlic in a bowl.

3. Add yeast water into flour mixture. Mix all ingredients and knead into a dough. Brush a little oil onto the dough.

4. Let the dough rise till 2 times big.

5. In a small bowl, mix 1/4 cup melted butter, 3 cloves garlic, 2 tablespoon chopped coriander.

6. Divide dough into 2 or even more smaller dough balls and flatten them into thin disc.

7. Brush butter garlic mixture onto the dough very generously.

8. Into 180 degree C oven and bake for 10-15 mins.

Salted Lemon

Last time, when my husband and I went to shopping for groceries, I found there’s sale on lemon. So I bought 2 packs of lemon. Then I decided to make salted lemon with them.

It’s quite easy.

1. Wash lemon in water. Sprinkle some salt over them. Rub with fingers. Then rinse under water. Dry them with kitchen towel.

2. Weigh them. This step is important. Cos we need to know the weight, then we can decide how much salt is needed. Salt should be 10%-15% weight of lemon. For example, my lemon is 150g, then the salt I use should be somewhere between 10g – 15g.

3. Cut lemon into wedges or slices. Put them in a sterilized jars.

4. Add in salt. Tighten the cap.

5. Shake the jar or bottle. Put it into fridge for 3-7 days.

Don’t forget to put a date label on it.

Salted lemon can be used to cook or to make drinks.